Your old ’98 Honda Civic is still going strong after getting quite a bit of extensive body and engine work done. Though, the body — looking beat up — brings a twinge of shame when idling at a stop. The rust and chipped paint make the thing look diseased… it’s time for a car paint touch up.
You hopped online and did what us junker owners did: “Can I paint my own car?”.
It turns out true, to your surprise!
What’s next? Get ready to rid your car of those unsightly blemishes. Got a bit of DIY creativity? Read on and find out how to DIY car paint touch-ups.
Items You’ll Need for a DIY Car Paint Touch Up
The total cost of materials may vary depending on the size of the job and local costs. But, a DIY paint job can cost as little as $50 – $100.
You will need:
- 2 cans/gallons of white Rustoleum primer
- 2 cans/gallons of (your car color) Rustoleum
- Brushes
- Paint tray
- Drop cloths
- Sandpaper multipack (60-800 grit)
- Dust mask
- Painter’s tape
It’s best to do the DIY paint job in all at once for even coating. You may choose to do a second (or third) application afterward. This is the reason for multiple cans or gallons of primer and paint.
The 5-Step Guide to a Car Paint Touch Up
Bodywork shops have their time and place like getting the big items repaired.
The shops do great work if you need an exact match for your car’s paint. But, you’ve got a good deal on a used vehicle and don’t want to dump extra funds in.
The DIY route is the way to go because you’re trading time for what would have cost you a couple hundred! Will it look exactly like the original paint job? It depends on how meticulous you choose to be — but, it’ll be pretty darn close!
Step 1: Match and buy the paint
The chances of you finding an exact match of the original paint color as a spray paint are slim. The paint has likely faded to a degree since it rolled off the lot.
It will also depend on the coverage area you plan to paint.
Larger areas will show noticeable DIY attempts. Smaller jobs, like scratches, will go unnoticed. Unless you’re zeroing in on the area and pointing it out, of course.
Find the color two ways:
- Check the firewall for the plat detailing the paint code
- Take a sample to a local hardware store to have them match
The paint will need to adhere to metal. The container or can indicates if the paint has these properties. Most choosing to paint their cars will use Rustoleum for this exact reason.
Step 2: Find a ventilated area
Take precautions by parking the vehicle in a well-ventilated area. This will prevent inhaling harmful fumes.
Try to choose a location where you can leave the vehicle for days since it will take a while for the paint to dry. Park the car on top of a drop cloth.
Also, avoid flammable objects for obvious reasons.
Step 3: Sand and clean the body
Remove vehicle trim.
Use painters tape and drop cloths to cover areas. These areas include the windshield, side windows, or tires.
Put on the dust mask and start with higher-grit sandpaper to remove rust spots from the car’s body. Work the area and downgrade to a finer grit as the spot becomes smooth. Repeat this process as many times as needed.
Wash the area and allow it to dry.
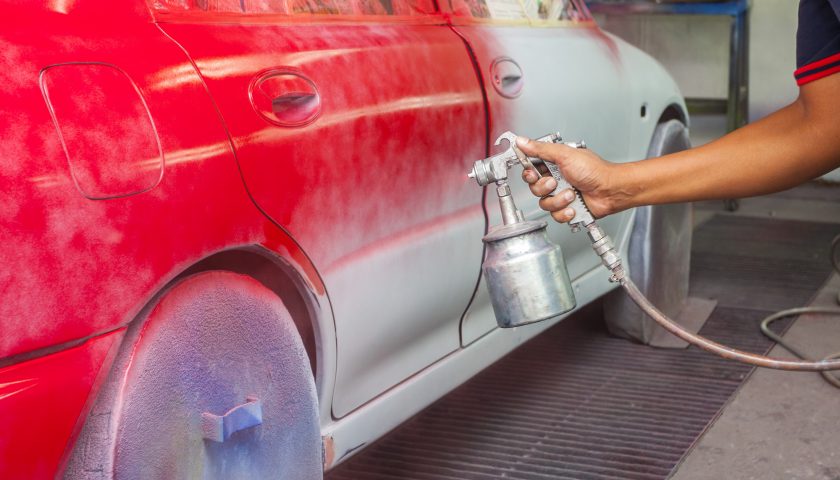
Step 4: Apply the paint
Two methods are available:
- Spraying directly onto the vehicle
- Watering down the paint and applying with a brush
Begin by applying white primer to the intended areas. The primer will help seal the area to prevent rust. It will also allow the color paint to stick more easily.
Spray evenly with long, swooping motions. Avoid spraying close to prevent drippage and runs. Otherwise, water down the paint making it easier to manage. Use the brushes to paint the area.
You may choose to apply the paint directly to areas like the undercarriage. These areas aren’t as visible so the workmanship doesn’t have to be exact. Plus, they’re hard to reach.
Optional: Use wet/dry sandpaper to blend the colors while the paint is wet. Blend and sand the area using small, circular motions.
Step 5: Dry, repaint, and wax/polish
Allow the coat of paint to dry for several days.
Examine your work and determine if a second or third coat is required. Avoid spot painting since this will distort the color or create a visual build-up. Paint all areas to create a uniform coverage if you decide to apply another coat.
Wax and polish the vehicle to make it shine!
When the Car Paint Touch Up Goes Wrong
What you thought was a Michaelangelo is coming out a Picasso.
We said you could do a DIY car paint touch up… we didn’t say if it’ll look perfect. Painting a car isn’t something you do often. You’re bound to make mistakes with the color matching and masking.
Here’s how to fix those mistakes:
Professionals
If the work is too shoddy then consider the body shop. It may cost a bit more but it’s usually a coin toss how well some do a DIY paint job. There may be an experienced DIYer in your area that would happily do the project for a trade, too.
Repair Kits
These kits are available at local auto stores. They include tools, paint, and applicators. It’s possible to use these in larger areas. But, their intended use is for small dings and scratches.
Put Car Paint Touch Ups Under Your DIY Belt
DIY car painting is one more item to add to your DIY auto repair list of accomplishments. This newfound skill has saved you $300-$500. Maybe more depending on how much was done!
The vehicle may not have that same new car color. But, at least you won’t hang your head in shame when driving around in public.
Want more ways to save on vehicle maintenance? Check out our car repair manuals for all your needs!