Auto decals are more than just stickers.
For businesses, they create money-making marketing opportunities. For the average car owner, they give you a fun way to personalize your ride.
But they can also damage your paint job if you don’t know what you’re doing. That’s why we’ve put together this ultimate guide to help you learn how to apply a decal to your car.
So let’s get started!
What You’ll Need to Get Started
Before you pull the wax paper off your decal, you’ll need to gather all the necessary tools.
Here’s a quick look at what you’ll need:
- Your decal
- Squeegee (designed for auto bodies)
- Rubbing alcohol
- Microfiber cloth
- Spray bottle (of water)
- Heat gun
- Razor blade (maybe)
- Soap
- Water
Depending on the size of your decal and where you place it, you might not need a razor blade. However, if your decal crosses a door opening, you’ll need to cut through the decal to allow the door to open.
You may also need a bucket to create a mixture of warm, soapy water. This will make cleaning the car—which is the first step of the process—a lot easier.
How to Apply a Decal to a Car
Applying a decal to your car is more involved than peeling off the back and sticking it in place. There are several steps you’ll need to follow to ensure it’s secure and air-bubble free.
Here’s a quick step by step guide for you to follow.
Clean the Area
Start by cleaning the area where you want to place your decal.
You can do this by scrubbing the car with a mixture of soap and water. But don’t stop there. Soap won’t be enough to remove any oils or waxes from the car’s surface.
That’s where the rubbing alcohol comes into play.
Pour some of the rubbing alcohol onto your microfiber cloth. Then rub down the area again to remove any remaining debris.
Test the Decal
Hold up your decal to the cleaned area.
Does it fit in the space you’ve cleaned? Do you like how looks in that area? Will it be easily visible to other drivers?
If you’re having second thoughts about the location you’ve chosen, it’s always a good idea to step back and reconsider. It’s much harder to make the change after you’ve already applied it.
Remove the Wax Paper
When you’re ready to apply your decal, start by pulling off the wax paper. But don’t do this until you’re ready. Otherwise, dirt or dust can stick to the adhesive surface, which can leave bumps in your decal.
If you’re applying a large decal, you might need someone else to help you hold the decal while you remove the wax paper.
Wet the Back
Use your spray bottle to wet the adhesive side of your decal. This will help it adhere to your car better, and it will allow you to slide the decal into place after you apply it.
Skipping this step might leave you with an uneven decal.
Apply the Decal
Gently pull the decal from both sides so it the middle is tight. Then place it on the surface of the car. Again, you might need someone to help you apply a large decal.
Slide the decal into the right place, then press down on the decal to help it adhere to the car.
Smooth out Any Bubbles
Use your squeegee to smooth out any air bubbles from behind your decal. Do your best to squish out all the water trapped behind the decal.
If you can’t get it all, don’t panic. We’ll come back to the water later.
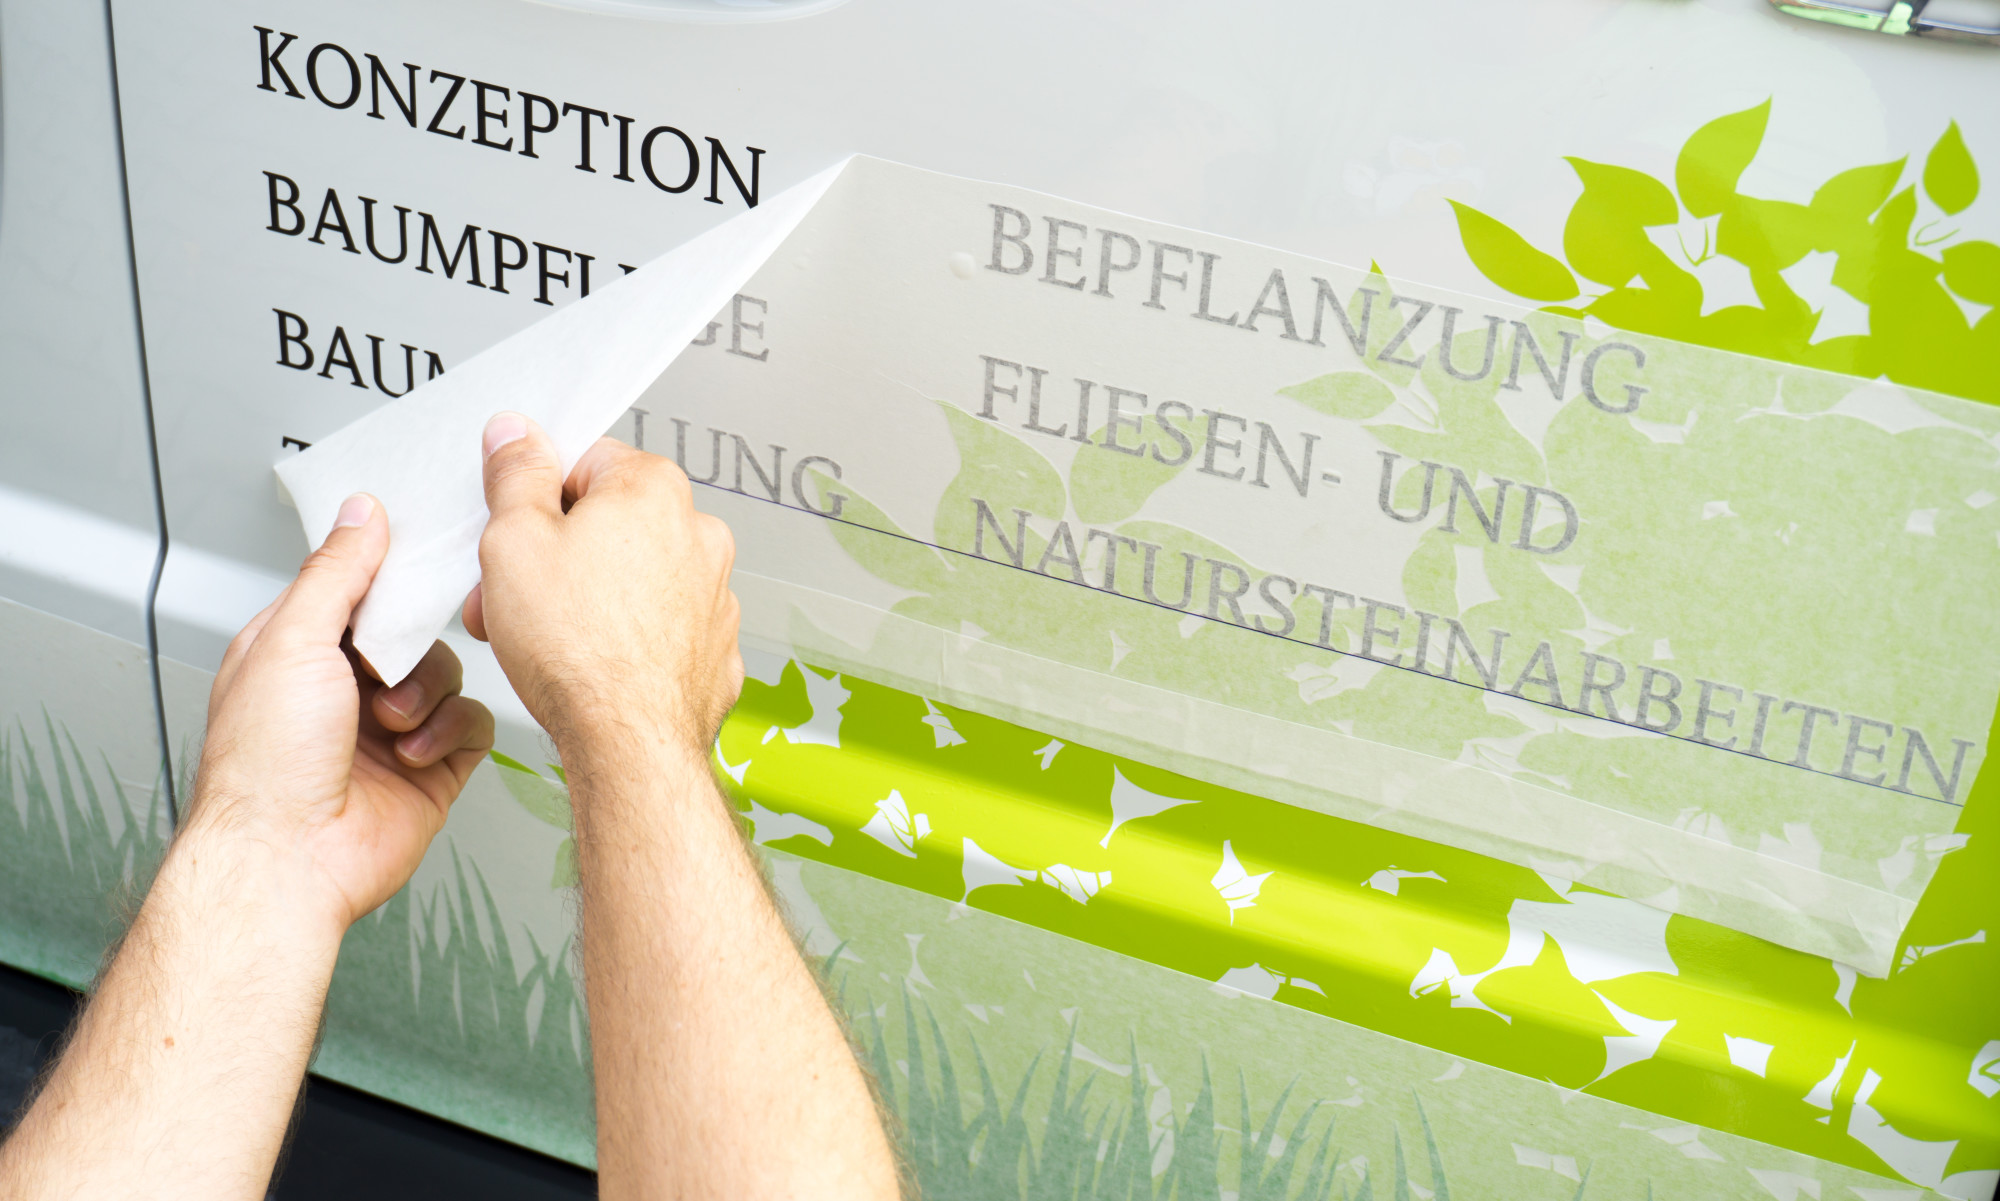
Remove the Application Tape
Peel the transfer tape off the front of the decal.
Start by lifting one edge of the transfer tape. Then use one hand to hold the decal in place and the other to pull the rest of the tape off.
You shouldn’t have a problem removing the transfer tape. However, if it’s being stubborn, let the tape sit on the decal for at least an hour. This gives the decal a chance to bond to the car, which can make removing the tape easier.
Squeeze out the Water
Now is the time to go back over the decal and remove any remaining drops of water. But don’t use your squeegee this time.
Since the transfer tape isn’t protecting the decal anymore, your squeegee could scratch your design. Instead, use your thumb to work out any water from under the decal.
Trim the Decal (If Necessary)
If your decal crosses any doors or other important openings, use your razor blade to cut through it. You most likely won’t need to worry about this step unless you’re applying a large decal, such as these truck graphics.
Dry the Decal
Use your heat gun to dry your decal, but don’t stay in one place for too long. Otherwise, you run the risk of damaging your decal.
It’s okay if you don’t dry the decal completely with your heat gun. Once you’ve gone over the decal a few times, give it a few hours to air dry the rest of the way.
The Ultimate Guide to Applying a Decal
Learning how to apply a decal to your car isn’t hard if you have the right tools. But make sure you take your time. Rushing through the process can make your decal end up crooked or bubbly.
Want to learn some other car maintenance jobs you can DIY?
Make sure you check out the rest of our blog!